Write spreadsheet data onto model items
Goal: take columns such as Cost and Supplier from an Excel sheet, match each row to a model item by GUID, and store the values as a searchable property tab on the item.
Before you start
- Open a model in Navisworks and the CamelGraph editor.
- Have an
.xlsxfile with one row for each item. One column, here with the headerGUID, holds the item's instance GUID as text. The other columns, hereCostandSupplier, hold the data. The first row holds the headers. - Keys match as exact text: capitals and lower case differ.
- Save the model first. The values are written into the open document. The source files are never changed.
Steps
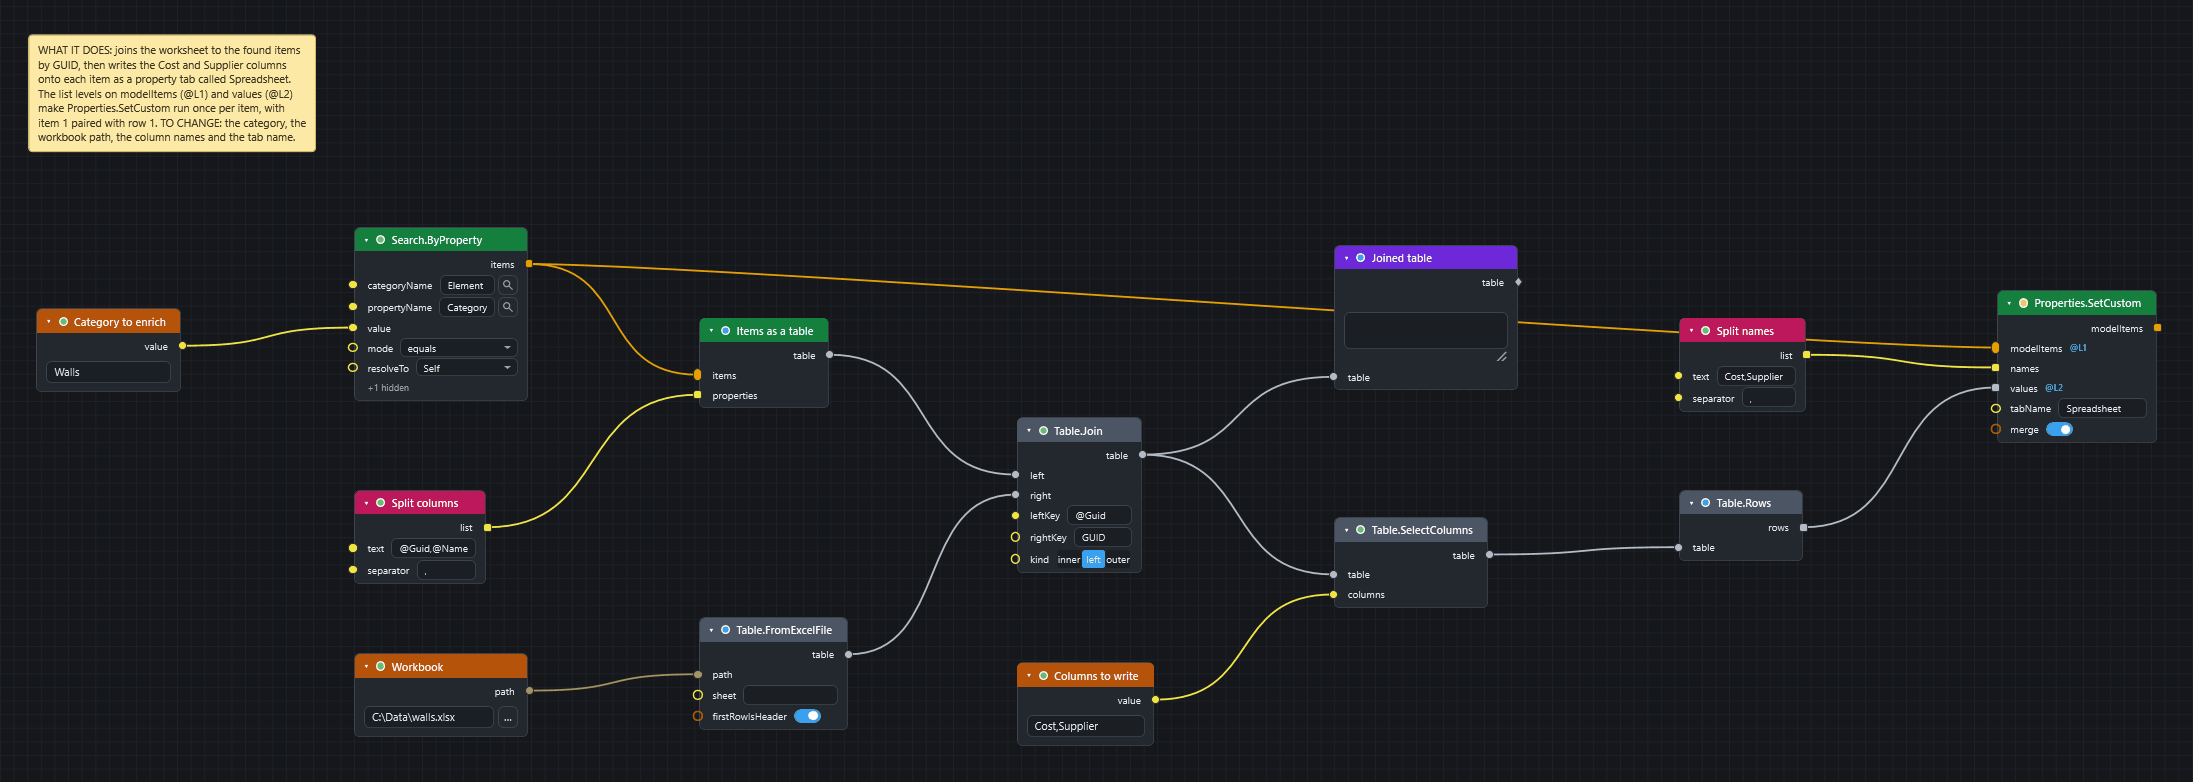
- Add a
Stringnode (Input), rename itCategory to enrichand typeWallsinto it. - Add
Search.ByProperty(Navisworks ▸ Search). TypeElementintocategoryNameandCategoryintopropertyName. Wire theStringintovalue, which has no box of its own. - Add
Properties.ToTable(Navisworks ▸ Properties). Wire the searchitemsinto itsitems. Itspropertiesinput has no box either: add aString.Split(String) with the text@Guid,@Nameand the separator,, and wire itslistinto it.@Guidis the item's instance GUID. - Add a
File Pathnode (Input), rename itWorkbookand type the full path, for exampleC:\Data\walls.xlsx. AddTable.FromExcelFile(Table) and wirepathinto itspath. - Add
Table.Join(Table). Wire theProperties.ToTabletable intoleftand the Excel table intoright. Type@GuidintoleftKeyandGUIDintorightKey, and chooseleftinkind. A left join keeps every item, in search order. A GUID matches whatever its capitals and small letters, and an item or row with a blank GUID is never matched. To join on two columns, give both names (Level, Mark) inleftKeyand inrightKey.Table.Unmatched(same inputs) lists the items that found no row in the sheet. - Add a
Watch Table(Display), rename itJoined table, wire the joined table into it and press F5. Check thatCostandSupplierare filled. An empty cell means the sheet has no row for that item. - Add a
Stringnode with the textCost,Supplier, rename itColumns to write, and wire it intocolumnsofTable.SelectColumns(Table). Wire the joined table into itstable. - Add
Table.Rows(Table) and wire the selected table into it.rowsholds one list of cells for each item. - Add
Properties.SetCustom(Navisworks ▸ Properties). Wire the searchitemsintomodelItemsandrowsintovalues. Add anotherString.Splitwith the textCost,Supplierand the separator,, and wire itslistintonames. TypeSpreadsheetintotabName. - Right-click the
modelItemssocket, choose List Levels and then@L1 — items. Right-click thevaluessocket, choose List Levels and then@L2 — lists of items. A badge shows on each socket. - Press F5 again.
What you get
Every item that the search found has a property tab called Spreadsheet with the properties Cost and Supplier. Open the Navisworks Properties window on an item to see it. The values are searchable and travel with the NWF or NWD.
Why step 10: Properties.SetCustom writes one list of names and values to all the items it is given. The list levels make it run once for each item, with item 1 paired with row 1, item 2 with row 2, and so on. Items and rows come from the same search and the same left join, so they line up. names is the same for every item and needs no level.
Running again with merge on (the default) keeps other properties in the tab and lets the new values win. Properties.RemoveCustomTab removes the tab.
A shorter way: Properties.SetCustomFromTable
Steps 7 to 10 can be one node. Add Properties.SetCustomFromTable (Navisworks ▸ Properties), wire the joined table into table, type Spreadsheet into tabName and @Guid into keyColumn, and leave items and columns empty. Every row finds its item by the GUID in the @Guid column, in one pass over the model, and every column except @Guid and the other @ columns becomes a property named after its header. No list levels are needed, rows that match no item are skipped and listed in missing, and the node checks every value before it writes to the first item. Without keyColumn, row 1 goes to item 1, row 2 to item 2 and so on, and the node refuses a table with a different number of rows than items.
One row for each GUID
If the sheet holds a GUID twice, the join adds a second row for that item and items and rows no longer line up. Remove duplicates first.
If it does not work
- The
CostandSuppliercells in the Watch Table are empty: the keys do not match. Compare one@Guidvalue with the sheet. Properties.SetCustomis red and says the value for a property "is a list of 2 values": thevaluessocket lacks its@L2badge, so a whole row reached one property. The node refuses it instead of writing the list into every item.- Items get the wrong values: a socket lacks its
@L1or@L2badge, or the sheet has duplicate GUIDs (Concepts). - A node is red: see Read errors and warnings.
Next
- Find elements from a list of GUIDs uses a sheet of GUIDs to select the items.
- Properties nodes lists
Properties.SetCustomand its companions.